Файл: Microsoft Word as a word processor. Inserting pictures, creation graphical objects.docx
ВУЗ: Не указан
Категория: Не указан
Дисциплина: Не указана
Добавлен: 16.03.2024
Просмотров: 41
Скачиваний: 0
ВНИМАНИЕ! Если данный файл нарушает Ваши авторские права, то обязательно сообщите нам.
Practical class
«Microsoft Word as a word processor. Inserting pictures, creation graphical objects»
Objectives: to develop skills as using graphical objects, such as OLE technologies.
Creation pictures in Word.These are the basic types of graphics that you can use to enhance your Word documents: drawing objects, SmartArt, charts, pictures, and clip art. Drawings refer to a drawing object or a group of drawing objects. Drawing objects include shapes, diagrams, flowcharts, curves, lines, and WordArt. These objects are part of your Word document. You can change and enhance these objects with colors, patterns, borders, and other effects. (Insert tab (Вкладка Вставка)Illustrations group (Группа элементов Иллюстрации) Shapes objects (Объект Фигуры)).
Group selected shapes. Select several shapes at a time by pressing CTRL on your keyboard and clicking each shape you want to include in the group. On the Format tab (ВкладкаФормат) in the Arrange group (Группа элементов Упорядочить),click Group (Группировать) so that all of the shapes will be treated like a single object. To cancel the group select your object and click Group (Группировать)Ungroup (Разгруппировать)or use context menu.
Pictures can be inserted (or copied):
-
from other applications (for example.,Paint, MsDrawing,Paintbrush and et.) -
Drawing object in current document (using Shapes objects). -
Using Clipart or Online pictures.
After you have inserted a picture or drawing object into a Word document, you can use a variety of tools to position the item relative to the page and text.
Picture position in text.
-
Select your picture, then open the Format tab (Вкладка Формат). -
Click on Wrapping Text (Обтекание текстом). Click the wrapping position that you want to apply.
OLE technology. The main differences between linked objects and embedded objects are where the data is stored and how you update the data after you place it in the Word file.
You place either a link to the object or a copy of the object in the document. You can insert objects this way from any program that supports the technology of linking and embedding objects (object linking and embedding, or OLE).
For example, a monthly status report may contain information that is separately maintained in an Excel worksheet. If you link the report to the worksheet, the data in the report can be updated whenever the source file is updated. If you embed the worksheet in the report, your report contains a static copy of the data.
1. Embedded object
2. Linked object
3. Source file
Linked objects.When an object is linked, information can be updated if the source file is modified. Linked data is stored in the source file. The Word file, or destination file, stores only the location of the source file, and it displays a representation of the linked data. Use linked objects if file size is a consideration.
Linking is also useful when you want to include information that is maintained independently, such as data collected by a different department, and when you need to keep that information up-to-date in a Word document.
Embedded objects.When you embed an Excel object, information in the Word file doesn't change if you modify the source Excel file. Embedded objects become part of the Word file and, after they are inserted, they are no longer part of the source file.
Because the information is totally contained in one Word document, embedding is useful when you do not want the information to reflect changes in the source file, or when you do not want the document recipients to be concerned with updating the linked information.
Two ways to use OLE technologies: Open Insert (Вкладка Вставка), then on the Text group(Группа элементов Текст)
-
Click on Object (Объект) -
Click on Text from file (Текст из файла)
The first method can be used for embedding (linking) a document fragment or an entire document, the second one is used only for an entire document.
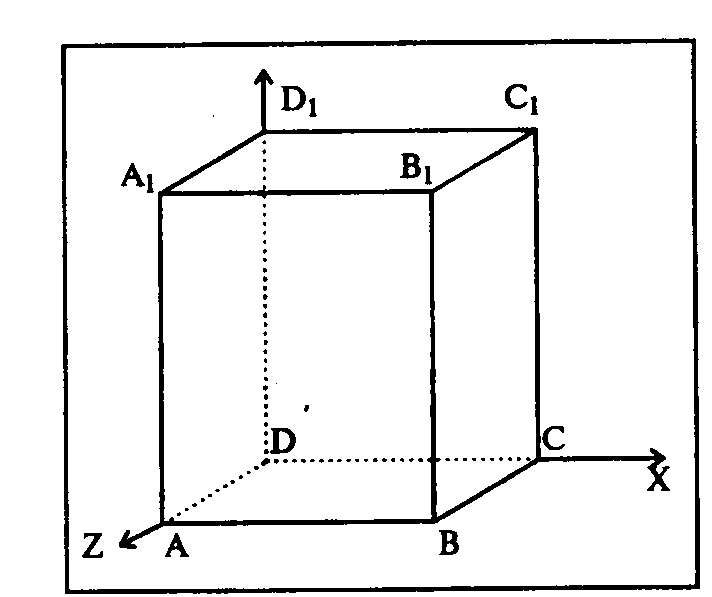
Exercise 1. Create scheme (see on the picture), group all graphical objects.
-
draw the rectangle ABB1A1; -
make a line, for example, A1D1; -
copy A1D1 and insert three times ВС, B1C1 and AD; -
make lines CC1, DD1, DC and D1C1; -
select lines and click on Format tab (Формат Вкладка)Shape Styles group (Группа элементов Стили фигур)Shape outline (Контур фигуры), choosing Dashes (Штрихи)Type of dashes (Тип штриха) – dotted-dashes (штрих пунктирный);
 -
finish drawing reference axes, choosing the instrument Line with arrow (Линия со стрелкой). For selecting AutoShape style, click the right button of the mouse over the object and select Format AutoShape (Формат автофигуры) in the right click menu. -
For placing the letter in the place required click onInsert tabText groupText box (Надпись) .
. -
Clicking the button Line color (Цвет линии) in Format tab (Вкладка формат)Shape Styles group (Группа элементов Стили фигур)Shape outline(Контур фигуры)(the frame should be selected), select in the given pallet No line (Нет Линии),similarly the following Fill color (Цветзаливки)
 — No fill (Нет заливки), your frame becomes transparent. Now the text can be placed in it (we need only one letter –top labelling).
9. Select your frame, copy it and paste 10 times. Sub index is established with the Home tab (Вкладка главная) Font group (Группа элементов Шрифт) Subscript Subscriptоr press CTRL+= (Нижний индекс).
10. Modify the drawing into the single graphics object. For this purpose activating on Home tab (Вкладка главная) Editing group (Редактирование) Select (Выбор) Select objects(Выборобъектов)
 button stretch the punctuated frame around the whole drawing (select the drawing) and click Format tab (Вкладкаформат)

Arrange group (Группа элементов упорядочить) select Group (Группировать).
Exercise 2: Embedded object creating (drawing)
-
Create a new document С:\My documents\Your Folder\Integration.doc -
Open Paint program, create a picture and save as Picture.bmp -
Copy the picture into the clipboard (select the picture and choose the command COPY). -
Paste an embedded object into the document in its full image. For this purpose:
-
Change to Microsoft Word (Integration.doc). -
Set the cursor into the place of embedded object to be placed and type any title; -
Run the command Home tab (Вкладка главная) click the arrow under Paste (Вставить), click Paste Special (Специальная вставка) for pasting the embedded object ; -
Set the option Paste (Вставить); -
Select Рисунок format, in the dialogue box select the flag Display as icon (В виде значка) and click ОК;
-
Edit the embedded object:
-
To see the drawing click 2 times with the mouse over the icon; -
Modify the drawing; -
Return to Integration.doc document -
Right Click over the icon. In the appeared menu select Объект упаковщика для оболочки ObjectConvert (Преобразовать).Unselect Display as icon (В виде значка) check boxОК.
-
Compare the initial drawing with the modified.
-
Switch to the window of Picture.bmp drawing and compare its content with the result after modifying the object in Integration.doc document.
Exercise 3: Linking object creating (text document)
-
Create the document Letter.txt in Notepad (Блокнот) and type the following text:
-
Switch to Integration.doc; -
Set the cursor in the place of linking object (text) pasting and type any content -
Paste the linking object using the command Insert tab (Вкладка Вставка) Group text (Группа элементов текст) Object (Объект)From file (Создание из файла) Select (Обзор)Select (Выделите) Letter.txt select display as icon (в виде значка); link to file (связь с файлом) check box.
-
Edit the source object and save the changings.
-
Close Integration document. -
Reopen Integration document. -
Compare the state of Integration document with the document Letter.txt.
Advancement questions:
-
What tool can be used for drawing the graphic objects in Word text processor? -
What approaches is the work with graphics based on in Word text processor? -
What is OLE –technologies? -
What is the difference between linked objects and embedded objects? -
What does Group objects mean?